Purchase Order Management
Purchase Orders (POs) in SimpleBillBook allow you to formally request goods or services from vendors before actual purchase. This helps in planning, budgeting, and ensuring proper documentation of procurement requests.
Overview of Purchase Orders
Purchase Orders serve as formal agreements between your business and vendors, specifying:
- What products/services you need
- Quantities and prices
- Delivery dates and terms
- Payment conditions
Viewing Purchase Orders
To view all purchase orders:
- Navigate to Manage Purchase → Purchase Order from the main sidebar
- You'll see a table listing all purchase orders with their current status
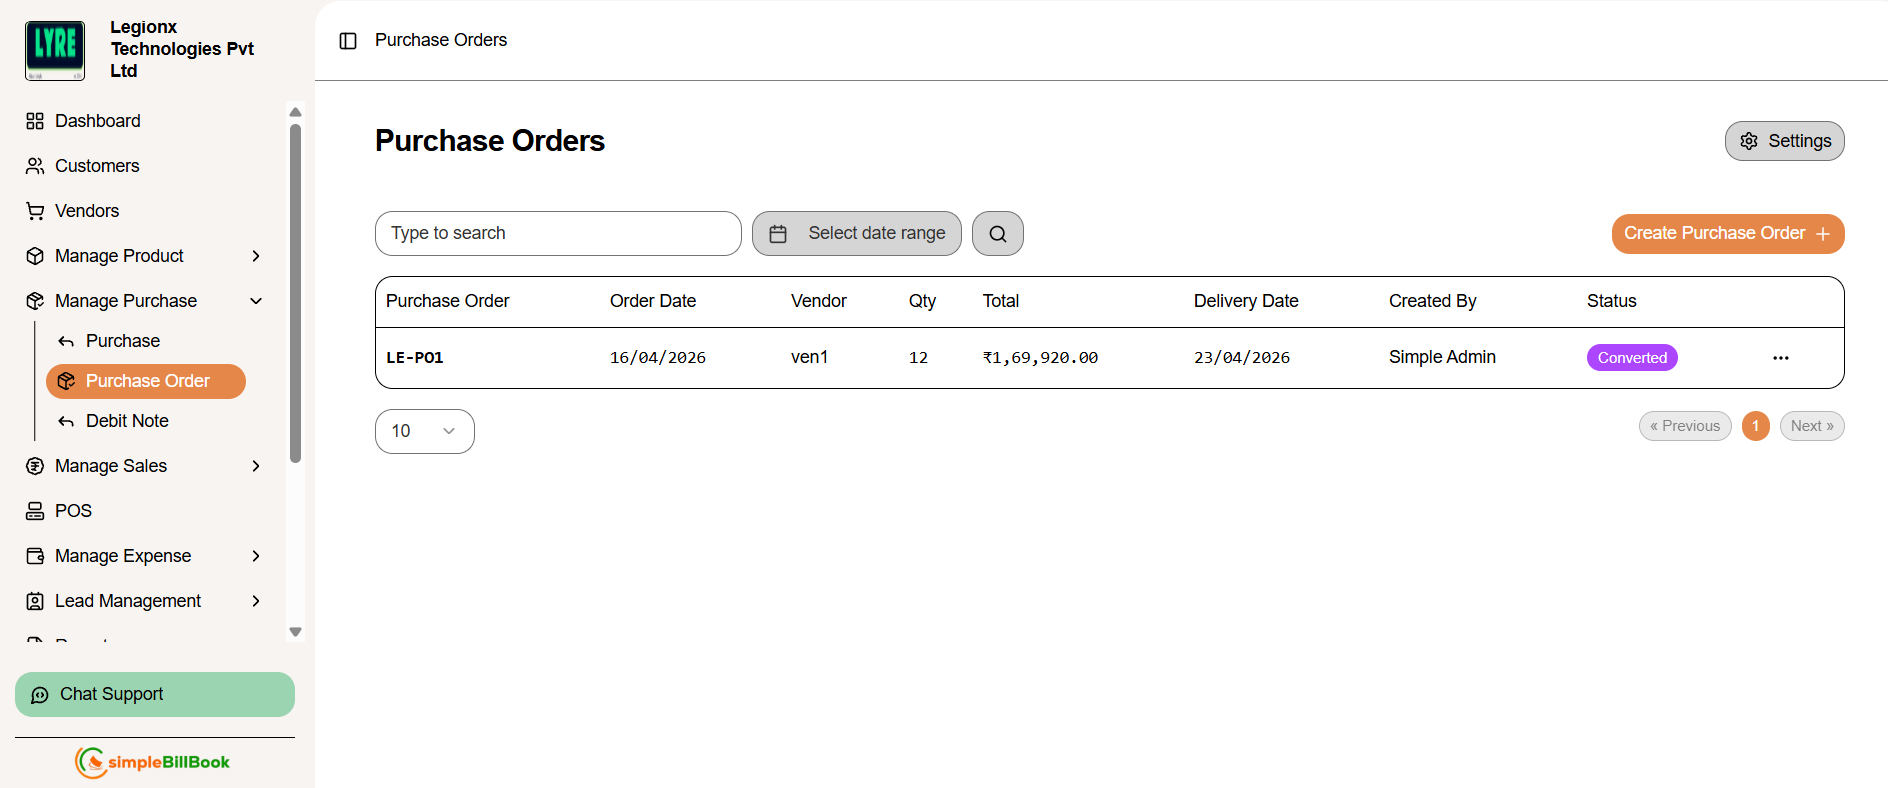 Figure 1: Purchase orders list showing all POs with status and details
Purchase Order Table Columns:
Order Information:
- Purchase Order: Unique PO number (e.g., PO1000)
- Order Date: Date when PO was created
- Vendor: Vendor name
- Qty: Total quantity of items ordered
Financial and Delivery Details:
- Total: Total order value
- Delivery Date: Expected delivery date
- Created By: User who created the PO
- Status: Current status (converted or pending)
Key Actions Available:
- Create Purchase Order: Start a new PO
- Settings: Configure PO numbering and terms
- Type to search: Filter/search existing POs
- Edit/View: Click on any PO to edit or view details
Creating a New Purchase Order
Step 1: Access PO Creation
Click Create Purchase Order from the POs list page.
Step 2: Fill Purchase Order Details
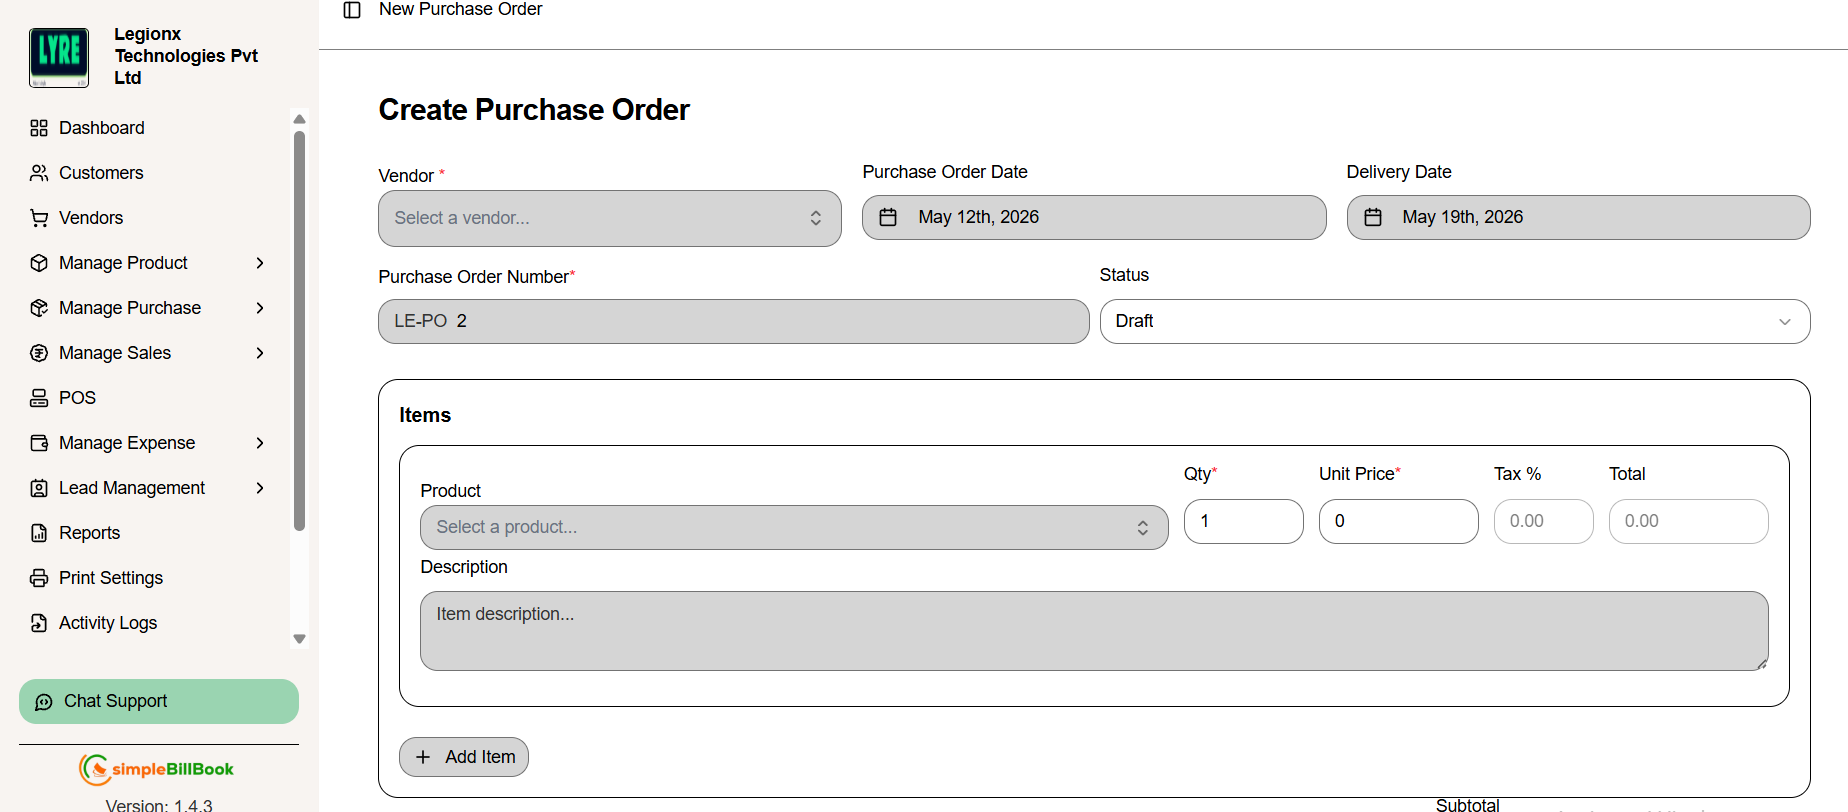 Figure 2: Form for creating new purchase orders
Header Information:
- Vendor: Select vendor from dropdown (required)
- Purchase Order Date: Auto-filled with current date (editable)
- Delivery Date: Expected delivery date from vendor
- PO Number: Auto-generated based on settings (e.g., LE-PO 2)
- Status: Defaults to "Draft" (can be changed to "Sent" , "Accepted" , or ""Rejected)
Item Selection:
- Click + Add Item to add products to the order
- Select Product from dropdown
- Enter quantity, unit price, and any item-specific notes
- Add multiple items as needed
Financial Summary:
- Subtotal: Sum of all item values before tax
- Tax Amount: Calculated tax based on tax settings
- Total Amount: Final amount including taxes
Step 3: Save Purchase Order
- Create purchase order: Save for later editing
Purchase Order Actions
Once purchase orders are created, you can perform various actions on them:
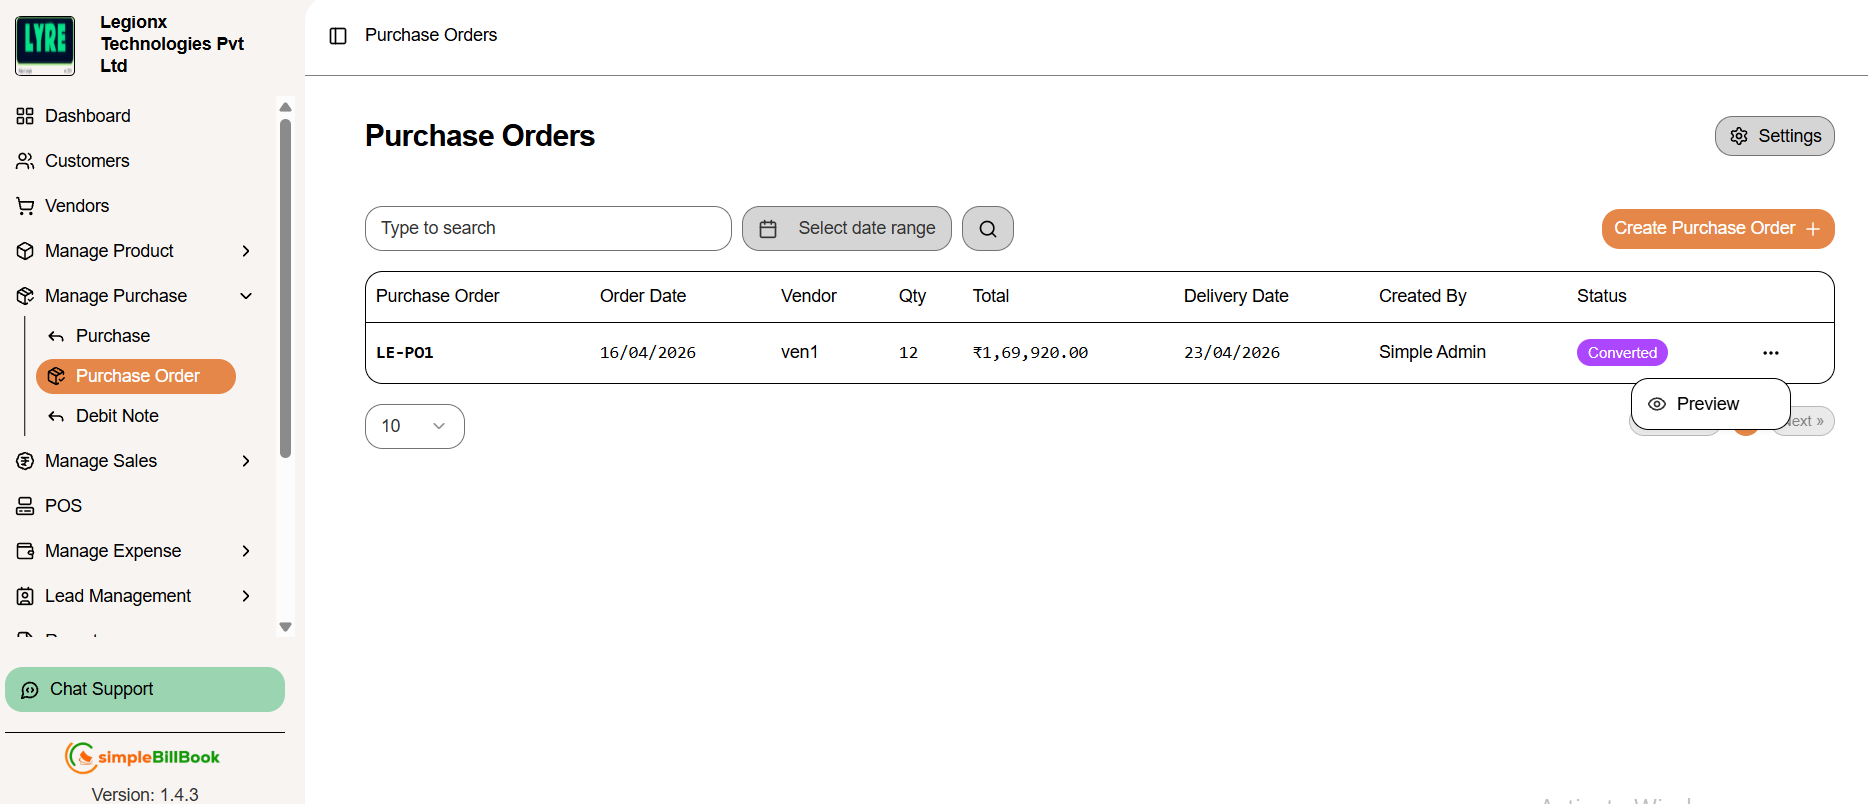 Figure 3: Purchase orders list with available action buttons
Available Actions
| Action | Description |
|---|---|
| Preview | View a printable version of the purchase order |
Example Purchase Orders
| PO Number | Date | Vendor | Qty | Total | Delivery Date | Status |
|---|---|---|---|---|---|---|
| PO1001 | 17/02/2026 | SWT Electronics | 4 | ₹82,400.00 | 24/02/2026 | Sent |
| PO1000 | 17/02/2026 | SWT Electronics | 2 | ₹51,500.00 | 24/02/2026 | Draft |
Purchase Order Settings
Accessing PO Settings
From the purchase orders page, click Settings to configure PO defaults.
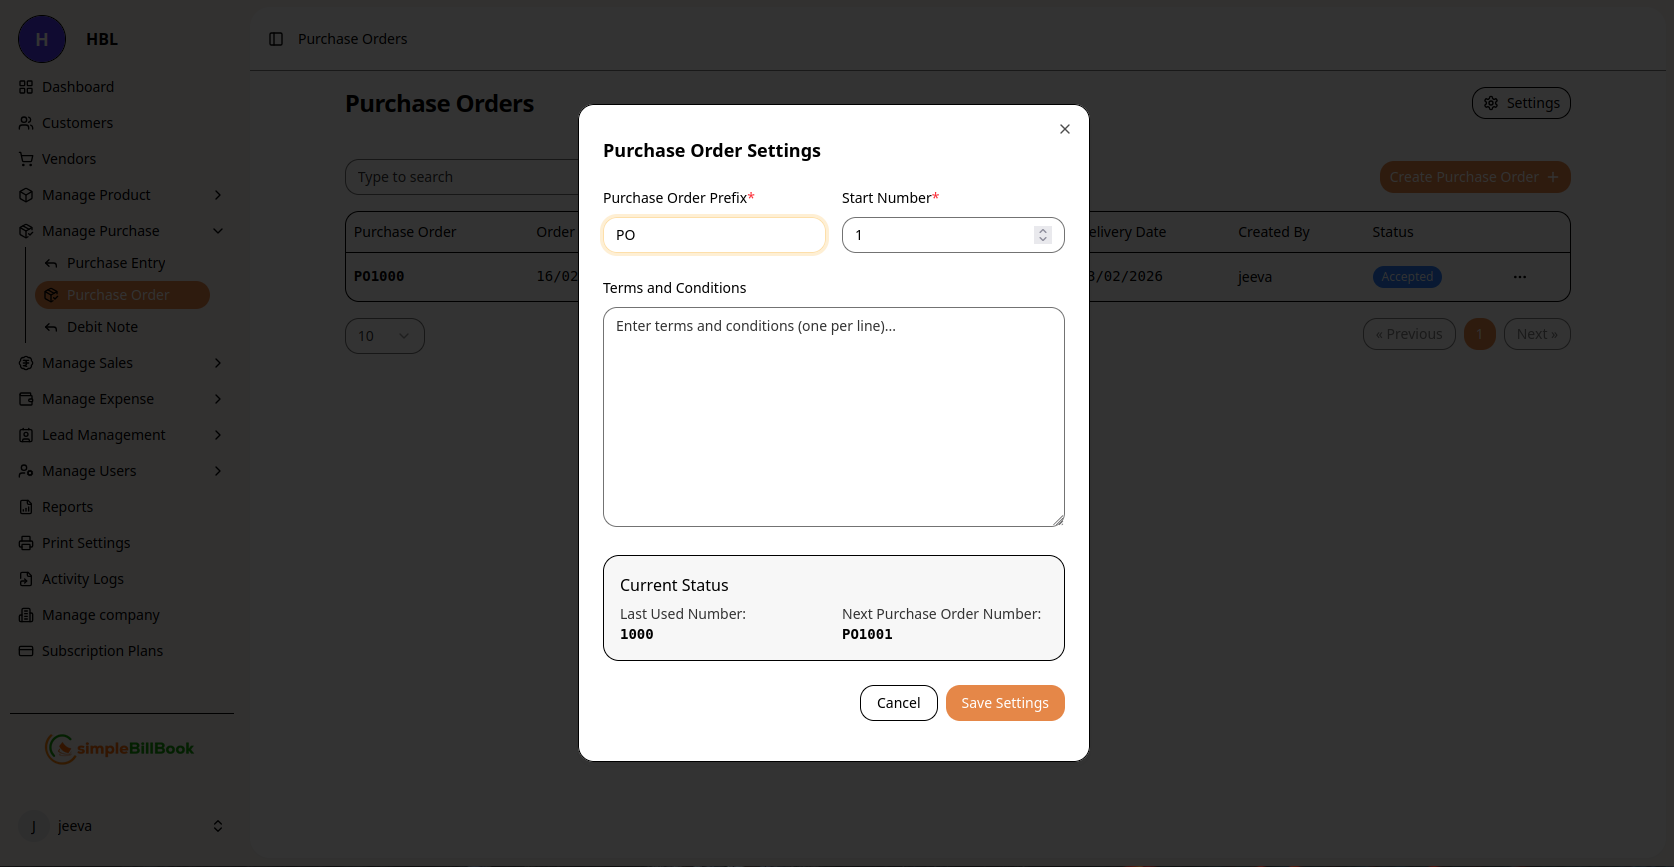 Figure 4: Configuration settings for purchase orders
Configurable Settings:
Numbering System:
- Purchase Order Prefix: Custom prefix (default: "PO")
- Start Number*: Beginning sequence number (required)
- Last Used Number: System tracks last generated number
- Next Purchase Order Number: Preview of next auto-generated number
Terms and Conditions:
- Default Terms: Enter standard terms (one per line)
- Payment Terms: Default payment conditions
- Delivery Terms: Standard delivery expectations
Other Settings:
- Default Status: Initial status for new POs
- Email Templates: Configure automatic email notifications
- Approval Workflow: Set up approval requirements
Saving Settings:
- Click Save Settings to apply changes
- Use Cancel to discard modifications
- Settings affect all future purchase orders
Purchase Order Workflow
Typical PO Lifecycle:
1. Draft Stage (Status: Draft)
- PO created but not yet finalized
- Can be edited and modified
- Not visible to vendor
2. Approval Stage (Status: Sent/Approved)
- Sent to vendor for quotation/confirmation
- May require internal approvals
- Vendor may accept or propose changes
3. Processing Stage (Status: Processing)
- Vendor acknowledges and processes order
- Items prepared for shipment
- Delivery scheduled
4. Delivery Stage (Status: Partially Received/Received)
- Goods received from vendor
- Quantity verification performed
- Quality checks conducted
5. Completion Stage (Status: Completed/Closed)
- All items received and accepted
- Converted to Purchase Entry
- Ready for payment processing
6. Cancellation (Status: Cancelled)
- Order cancelled before fulfillment
- Reasons documented
- Vendor notified
Best Practices for Purchase Order Management
Creating Effective POs:
- Clear Descriptions: Use specific product names and codes
- Accurate Quantities: Double-check order quantities
- Realistic Dates: Set achievable delivery timelines
- Complete Information: Include all necessary vendor details
- Terms Clarity: Specify payment and delivery terms explicitly
Vendor Communication:
- Send Promptly: Send POs to vendors as soon as approved
- Confirm Receipt: Verify vendor received the PO
- Track Responses: Monitor vendor acknowledgments and quotes
- Update Status: Keep PO status current throughout process
Internal Coordination:
- Budget Alignment: Ensure POs fit within budget constraints
- Department Approval: Follow internal approval workflows
- Inventory Planning: Coordinate with inventory team for expected deliveries
- Receiving Preparation: Prepare receiving department for expected shipments
Converting PO to Purchase Entry
When Items are Received:
- Locate the PO in the list
- Click Convert to Purchase action
- Verify received quantities against PO
- System auto-creates Purchase Entry
- PO status updates to "Received" or "Completed"
Partial Receipts:
- Record actual received quantities
- System creates Purchase Entry for received items only
- PO shows remaining balance
- Update PO when remaining items arrive
Common Scenarios and Solutions
Scenario 1: Price Changes After PO Sent
Solution:
- Communicate with vendor for updated pricing
- Create new PO if significant changes
- Or create Purchase Entry with adjusted prices
- Document reasons for changes
Scenario 2: Vendor Cannot Deliver on Time
Solution:
- Update PO with new delivery date
- Consider partial shipments if possible
- Evaluate alternative vendors for urgent needs
- Document delays for vendor performance tracking
Scenario 3: Items Not as Specified
Solution:
- Do not accept non-conforming items
- Return to vendor with explanation
- Update PO to reflect actual received items
- Request replacement or credit
Scenario 4: Multiple Shipments for One PO
Solution:
- Receive each shipment as it arrives
- System tracks partial receipts
- PO shows cumulative received quantities
- Finalize when all items received
Integration with Other Modules
Vendor Management:
- PO History: Tracks all POs with each vendor
- Performance Metrics: Analyzes vendor delivery reliability
- Spending Analysis: Monitors purchasing patterns by vendor
Inventory Management:
- Expected Stock: POs show future inventory additions
- Reorder Planning: Helps plan for stock replenishment
- Budget Forecasting: Aids in inventory budget planning
Financial Planning:
- Commitment Tracking: POs represent future financial commitments
- Cash Flow Projection: Helps forecast future payments
- Budget Control: Monitors actual vs. planned purchases
Purchase Management:
- Seamless Conversion: POs convert to Purchase Entries upon receipt
- Document Trail: Maintains complete procurement history
- Variance Analysis: Compares PO vs. actual purchase details
Reports and Analytics
Available PO Reports:
- Open POs Report: All POs not yet completed
- PO vs. Purchase Analysis: Compare ordered vs. received
- Vendor Performance: Delivery timeliness and accuracy
- Departmental Spending: POs by department or category
- Pending Approvals: POs awaiting authorization
Key Metrics to Monitor:
- PO Cycle Time: From creation to completion
- Vendor Compliance: Adherence to PO terms
- Budget Variance: PO value vs. actual purchase cost
- Partial Delivery Rate: Frequency of split shipments