Purchase Management
Purchase management in simpleBillBook helps you track inventory procurement from vendors, manage purchase orders, and maintain accurate stock records. This guide covers creating purchase entries, configuring purchase settings, and managing vendor transactions.
Overview of Purchase Management
Purchase management consists of three main components accessible from the sidebar:
- Purchase: Record actual purchases from vendors
- Purchase Order: Create purchase orders for future procurement
- Debit Note: Handle returns or adjustments with vendors
Viewing Purchase History
To view all purchase records:
- Navigate to Manage Purchase → Purchase from the main sidebar
- You'll see a comprehensive table of all purchase transactions
 Figure 1: Purchase entries list showing transaction history
Purchase Table Columns:
Transaction Details:
- Purchase Number: Unique identifier (e.g., PUR1, PUR2)
- Purchase Date: Date of purchase
- Vendor: Vendor name
- Qty: Total quantity of items purchased
Financial Information:
- Total: Total purchase amount
- Amount Paid: Amount already paid to vendor
- Created By: User who created the purchase entry
- Payment Status: Paid/Unpaid status
Search and Filter:
- Type to search: Search by purchase number, vendor, or other criteria
- Pagination: Navigate through multiple pages of purchase records
- Date range: Users can filter and view data based on a selected date range.
Creating a New Purchase
Step 1: Access Purchase Creation
From the purchases page, click Create Purchase button to create a new purchase.
Step 2: Fill Purchase Details
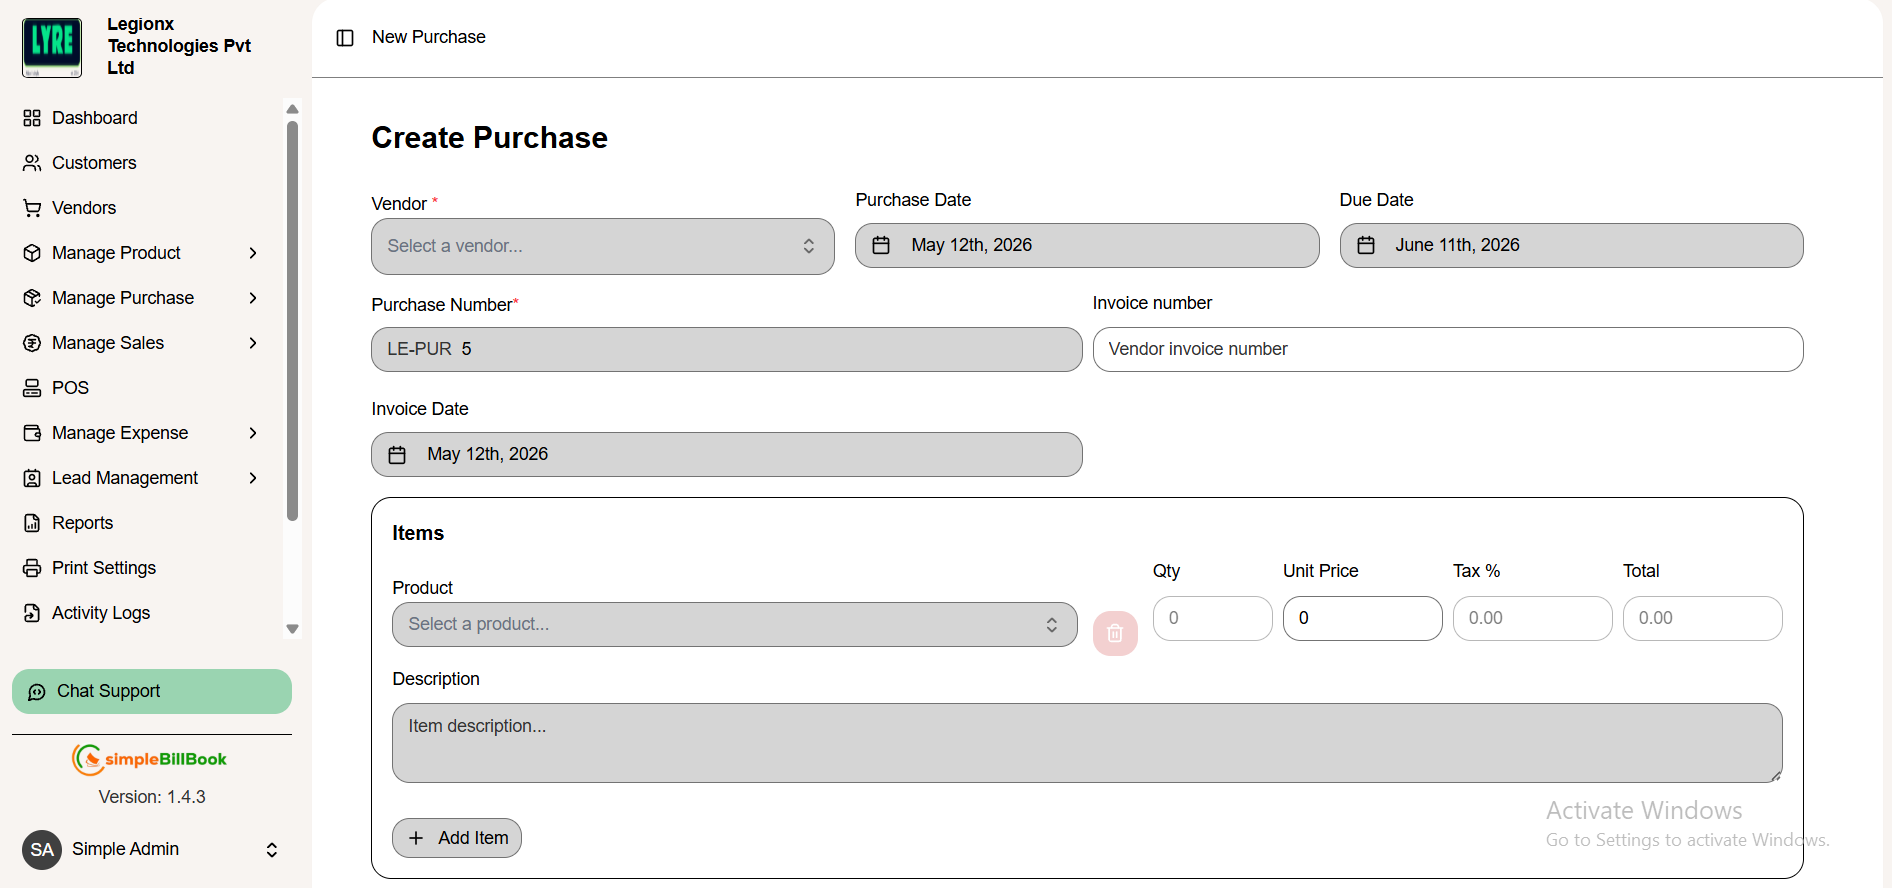 Figure 2: Form for creating new purchase entries
Vendor Information:
- Vendor: Select vendor from dropdown (required field)
- Purchase number: Auto-generated (PUR2 in example) based on settings
- Vendor invoice number: Optional - vendor's reference number
Item Selection:
- Click + Add Item to add products to the purchase
- Select Product from dropdown (e.g., home theatre)
- Enter quantity, unit price, and other details for each item
- Add multiple items as needed
Payment Information:
- Mark as Full Paid: Checkbox to indicate complete payment
- Payment Status: Auto-updates based on payment (Unpaid/Paid/Partial)
- Amount Paid: Enter amount paid at time of purchase
Additional Details:
- Notes: Add any relevant notes or terms
- Purchase Date: Defaults to current date (editable)
- Description: Add any relevant description of a product
Step 3: Save Purchase
After filling all details, click create purchase for save purchase entry. The system will:
- Update inventory stock levels
- Create payable entry for vendor (if unpaid)
- Generate purchase number
Purchase Settings Configuration
Accessing Purchase Settings
From the purchase management section, access settings (typically via gear icon or Settings menu).
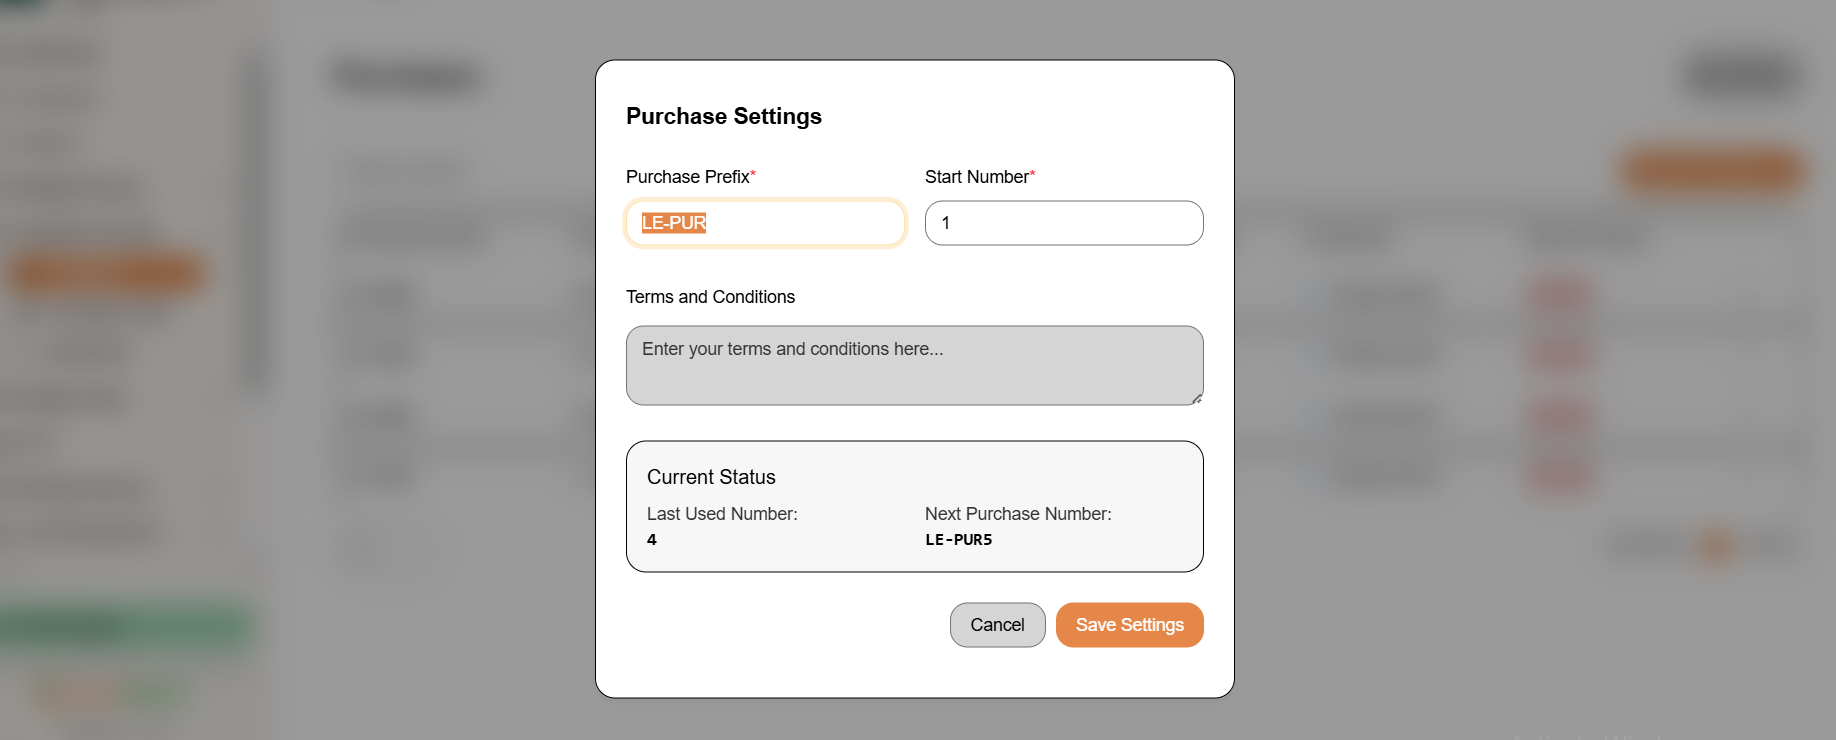 Figure 3: Purchase numbering and configuration settings
Configurable Settings:
Purchase Numbering:
- Purchase Prefix: Custom prefix for purchase numbers (default: PUR)
- Start Number: Starting sequence number
- Terms and Conditions: Enter your Terms and conditions of a purchase
- Last Used Number: System tracks last generated number
- Next Purchase Number: Preview of next auto-generated number
Display Settings:
- Purchase Date Format: Configure date display format
- Default Payment Terms: Set standard payment terms
- Tax Settings: Configure default tax rates
Saving Settings:
- Click Save Settings to apply changes
- Use Cancel to discard modifications
- Settings affect all future purchase entries
Purchase Workflow: Step-by-Step
Complete Purchase Process:
1. Pre-Purchase Preparation:
- Ensure vendors are added in Vendors section
- Verify products exist in inventory
- Check purchase settings are configured
2. Creating Purchase Entry:
- Select vendor from existing list
- Add purchased items with quantities and prices
- Set payment status and terms
- Add any special notes
3. Post-Purchase Actions:
- Stock Update: Inventory automatically increases
- Vendor Payable: Amount added to vendor's account
- Document Generation: Purchase receipt created
4. Payment Processing:
- Record partial or full payments
- Update payment status
- Track outstanding balances
Types of Purchase Transactions
1. Standard Purchase Entry
- Record completed purchases
- Immediate stock update
- Vendor payment tracking
2. Purchase Order (Future Order)
- Create orders for future delivery
- No immediate stock impact
- Track expected deliveries
3. Debit Note (Purchase Return)
- Handle returns to vendors
- Reduce stock levels
- Adjust vendor payables
Best Practices for Purchase Management
Vendor Management:
- Verified Vendors: Only purchase from verified, active vendors
- Payment Terms: Negotiate and record clear payment terms
- Documentation: Keep vendor invoices and correspondence
Purchase Recording:
- Timely Entry: Record purchases immediately upon receipt
- Accurate Quantities: Verify received quantities match purchase
- Price Validation: Confirm prices match purchase agreements
- Tax Compliance: Ensure proper tax recording and calculations
Inventory Integration:
- Stock Updates: Verify inventory updates after purchase
- Quality Checks: Inspect goods before updating stock
- Barcode Generation: Generate barcodes for new stock items
Financial Controls:
- Approval Workflow: Implement purchase approval processes
- Budget Adherence: Monitor purchases against budgets
- Payment Scheduling: Schedule payments to optimize cash flow
Common Scenarios and Solutions
Scenario 1: Partial Shipment Received
Solution:
- Create purchase entry for received items only
- Note remaining items as pending
- Update purchase when remaining items arrive
Scenario 2: Price Discrepancy
Solution:
- Record purchase at invoiced price
- Contact vendor for clarification
- Create debit note for adjustments if needed
Scenario 3: Damaged Goods Received
Solution:
- Do not update inventory for damaged items
- Create debit note for return
- Record only good items in purchase entry
Scenario 4: Bulk Purchase with Multiple Items
Solution:
- Use + Add Item for each product
- Group related items in single purchase
- Apply appropriate taxes to each item type
Integration with Other Modules
Inventory Management:
- Automatic Stock Update: Purchases increase stock levels
- Stock Value Calculation: Updates average cost and total value
- Reorder Points: Can trigger reorder alerts
Vendor Management:
- Purchase History: Tracks all transactions with each vendor
- Payable Tracking: Monitors outstanding balances
- Performance Metrics: Analyzes vendor reliability and pricing
Financial Accounting:
- Expense Recording: Purchases recorded as expenses or inventory
- Tax Reporting: Captures input tax credits
- Cash Flow Management: Tracks outgoing payments
Reporting and Analytics:
- Purchase Reports: Monthly, quarterly, annual purchase summaries
- Vendor Analysis: Spending by vendor category
- Inventory Valuation: Cost of goods purchased